Hey there, fellow packaging pros and molders! If you’ve ever dealt with in-mold labels (IMLs), you know that one wrong move with material compatibility can turn a promising batch of parts into a total disaster. Picture this: you send a client a roll of IMLs, they pop them into their injection molding machine, and halfway through the run, labels start bubbling, peeling, or fading like a bad sunburn. Sound familiar? I’m [your name, but keep it casual—no need for a specific moniker, just “your go-to IML supplier here”] from an IML label shop, and I’ve seen this exact scenario way too many times. Today, we’re breaking down how to make sure your IMLs and molding materials play nice, no awkward run-ins or wasteful rejects allowed. In-Mold Labels
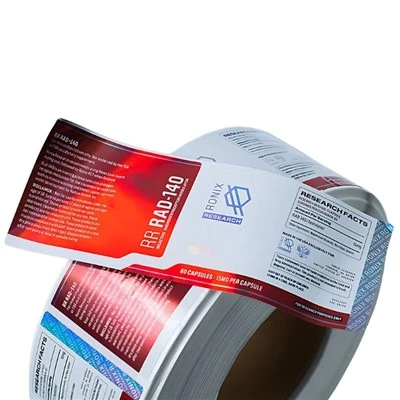
First off, let’s get one thing straight: compatibility isn’t a guess—it’s a science, but it’s a science that’s actually pretty manageable once you know the key players. A lot of folks new to IMLs think it’s just sticking a label in a mold. Nah, it’s way more than that. The label’s job is to stick, look good, and survive whatever the molding material throws at it—whether that’s hot plastic, pressure, or even years of being on a water bottle or a dishwasher-safe appliance. So let’s dive into the big factors that make or break this match.
First up, the molding material. I know, I know—you guys know your polypropylene (PP) from your PET, but let’s recap because this is non-negotiable. Each plastic has its own personality: it melts at a certain temp, has specific chemical properties, and even shrinks differently as it cools. For example, PP is super common for food containers because it’s flexible and safe, but it shrinks a lot when it solidifies, which can tug on the IML if the label isn’t engineered to stretch with it. PET is stiffer, used for soda bottles, and it’s got a higher melting point, so the label has to handle that extra heat. Then there’s ABS, used for things like appliance housings—tougher, but more prone to picking up static, which can make labels stick to the mold instead of the plastic.
Here’s where I come in: before I even send a client IMLs, I ask for the deets on their molding material. No generic “we use plastic” answers, please. I need to know if it’s PP homopolymer or copolymer, if it’s got any additives (like UV stabilizers, impact modifiers, or even food-safe coatings), its melt temperature range, and the mold shrinkage rate. Additives are a big one—some slip agents or mold release chemicals in the plastic can mess with the label’s adhesion. I once had a client swear their PP had no additives, turns out they used a tiny amount of mold release to get parts out faster, and that made the labels peel. We had to adjust the label’s adhesive and test again, which cost us both time—lesson learned: don’t skip the additive check.
Next, the label’s core structure. IMLs aren’t just paper or plastic with glue. They’re multi-layered, like a tiny sandwich. The top layer is the print layer—usually a special film (PET, PP, or even polycarbonate) that resists fading, scuffs, and chemicals. Then there’s an adhesive layer, but wait—this isn’t the same glue you use for a school project. The adhesive has to be activated by the hot molten plastic in the mold. That’s a key point: IML adhesives are heat-activated, not pressure-sensitive like regular stickers. So the adhesive’s melting temp and chemical makeup have to match the plastic’s. If the adhesive melts too early, it’ll get gooey and messy, causing labels to smudge or stick to the mold. If it melts too late, it won’t bond to the plastic at all.
For example, if a client is molding with PP, we’ll use a PP-based film (since PP and PP “bond” better, kind of like how same-family materials stick) and a PP-compatible heat-activated adhesive. If they’re using PET, we go with a PET film and PET adhesive. Mixing material families is a recipe for disaster—like trying to stick metal to wood with regular glue. It might work for a little, but eventually, it’ll come apart. I’ve had clients ask, “Can I use the same IMLs for both PP and PE?” and my answer is always no—they’re different plastic families, their molecules don’t mesh well, so the adhesion will fail over time.
Another thing about the label structure: thickness. The label’s thickness has to match the molding material’s shrinkage and the mold’s cavity design. If you have a thin label on a PP part that shrinks a lot, the label can’t stretch with the plastic, so it wrinkles. We run shrinkage tests on every material-label combo we work with—we take small sample labels, mold tiny test parts with the client’s material, and measure how much the part and the label shrink. If they’re off by more than like 2%, we adjust the label’s thickness or the plastic grade to get in sync. Recently, a client was molding lids for takeout containers with a high-shrink PP, and their initial labels were 12 microns thick—too thin, so when the lid cooled, the label wrinkled. We bumped it up to 18 microns, perfect thickness for that PP shrink rate, and the run went off without a hitch.
Now, the molding process itself—this is a part a lot of people overlook, and it’s a huge compatibility factor. Even if your IMLs and plastic are a perfect match, if the machine settings are wrong, it’ll mess everything up. Let’s talk temp first: the mold temperature and the plastic melt temp. For IMLs, the mold temp can’t be too low—if it’s too cold, the plastic solidifies before the label can bond, so the adhesive doesn’t activate. If it’s too high, the label’s top layer can warp or the ink can bleed. For PP, ideal mold temp is usually around 30-50°C, melt temp around 180-220°C. For PET, mold temp is a bit higher, like 60-80°C, melt temp around 250-280°C. We always share a process guide with clients when we send IMLs, tailored to their material, that spells out these temps, pressure settings, and cycle times. I had a client who kept having label peeling issues, and it turned out they were running the mold 20°C cooler than we recommended. Once they cranked it up a little, the labels bonded like they were supposed to.
Pressure is another big one. The injection pressure—how hard the plastic is forced into the mold. If pressure is too low, the plastic doesn’t flow all the way around the label, so parts of the label don’t make contact, leading to weak spots. If pressure is too high, the label can tear or shift in the mold, making the print off-center or incomplete. We test pressure ranges with clients during trial runs, so we can find the sweet spot where the plastic fully encapsulates the label without damaging it.
Wait, let’s not forget surface preparation. The mold cavity where the label goes has to be clean, right? If there’s leftover plastic residue, dust, or even old label adhesive in the cavity, the new label won’t stick properly. A client once had random labels peeling on the sides of their parts, and we realized their mold wasn’t being cleaned between runs—they had bits of PP left over from the last batch, creating a barrier. Now they have a strict cleaning schedule, and that problem’s gone. Also, some plastics need to be corona-treated? No, wait—IMLs are inserted into the mold before molding, so the plastic’s surface isn’t treated post-molding like with pressure-sensitive labels. But the label’s backside (the side that touches the plastic) has to be free of any release agents or dust too—we package IMLs in anti-static, dust-free rolls to prevent that, and we tell clients to handle them with clean gloves, not bare hands.
Now, let’s talk about testing—because you never want to find out a combo is bad during a full production run. Trial runs are non-negotiable, even if you think you have the perfect match. When a new client comes to me, I don’t just send a roll of labels and hope. We do small-scale trials first—like 100-200 parts—to test adhesion, print durability, and how the label holds up during molding. We do adhesion tests by pulling the label off the part (gently, not ripping it) to see how much force it takes, and we check for bubbling, peeling, or ink smudging after the parts sit for a week (because some adhesion issues show up over time, not right away). We also do aging tests—exposing the part to UV light, heat, or dishwasher cycles, depending on what the final product will be used for. For a client making reusable water bottles, we tested the parts in a dishwasher 50 times to make sure the labels didn’t fade or peel—luckily, our PP-based IMLs with UV-resistant ink passed with flying colors.
Another common mistake: generic labels. A lot of clients try to use “universal” IMLs to save money, but those are usually designed for average materials, not specific ones. Universal labels might work for a PP part that’s not heated, but if it’s a hot-filled container, that universal adhesive will fail. I always tell clients: custom labels aren’t that much more expensive, and they save you from wasting thousands of dollars in rejects. Let’s be real—if a production run is 10,000 parts, and half of them have bad labels, that’s a huge cost. Custom, material-specific labels might add a few cents per part, but the peace of mind is worth it.
Wait, what about special cases? Like food-safe or medical-grade applications? Those have extra compatibility checks. The label has to meet FDA or EU food contact standards, and the adhesive can’t leach any chemicals into the plastic. We work with our label suppliers to make sure every component is certified, and we provide those certificates to clients—no cutting corners here. For medical parts, we also have to make sure the label doesn’t leave any residue when the part is sterilized (like with autoclaving or ethylene oxide), so we adjust the label’s adhesive to be resistant to those sterilization methods.
Let me wrap this up with a quick checklist, because I know you guys love checklists. To ensure IML and molding material compatibility:
- Give your IML supplier full details on your molding material: type (PP, PET, ABS, etc.), grade, additives, melt temp, shrinkage rate. No vague answers!
- Use material-specific IMLs, not universal ones—match the label’s film and adhesive to your plastic’s family.
- Test label thickness against your plastic’s shrinkage to avoid wrinkling or shifting.
- Follow the tailored molding process guide: hit the right mold temp, melt temp, and pressure settings.
- Do small-scale trial runs before full production to catch any issues early.
- Keep molds and labels clean during handling and setup—no residue or dust allowed.
- For special applications (food, medical), ask for certified, material-specific components.
At the end of the day, compatibility is all about communication between you, your molding team, and your IML supplier. I’ve been in this game long enough to know that when everyone is on the same page, from the material specs to the machine settings, you get perfect parts, happy clients, and zero wasted time or money. If you’re dealing with label compatibility issues right now, or you just want to make sure your next run goes smooth, hit me up to chat through your needs. No sales pitches, no confusing jargon—just real talk and solutions that work.
Holographic Stickers References:
- Harper, C. A. (2002). Modern Plastics Handbook. McGraw-Hill Education.
- Soroka, W. (2008). Fundamentals of Packaging Technology. Institute of Packaging Professionals.
- International Organization for Standardization. (2019). ISO 12063:2019, Plastics – Injection molding of test specimens for the determination of shrinkage and mold flow characteristics.
- American Society for Testing and Materials. (2021). ASTM D3359-21, Standard Test Methods for Measuring Adhesion by Tape Test.
SpeedPrint Era (Xiamen) Digital Co., Ltd.
SpeedPrint Era (Xiamen) Digital Co., Ltd. is one of the most professional in-mold labels manufacturers and suppliers in China, featured by quality products and low price. Please rest assured to wholesale advanced in-mold labels made in China here and get quotation from our factory. We also accept customized orders.
Address: Floor 1, No. 27, Xianghong Road, Xiang’an District, 361101, Xiamen, Fujian, China
E-mail: hxmacka@gmail.com
WebSite: https://www.lumolabels.com/
